
Ham radio, also known as amateur radio, is a popular hobby that allows enthusiasts to communicate with others around the world using a wide range of frequencies. Setting up a ham radio station may seem like a daunting task, but with proper planning and equipment, anyone can create their own personal communications hub.
Before embarking on this exciting journey, it is essential to understand the basics of ham radio operation, including obtaining a license and selecting equipment such as a transceiver, power supply, and antennas. Location plays a crucial role, as it affects the efficiency and effectiveness of your station, so carefully consider where to establish your base. By following a step-by-step guide, even beginners can successfully set up their own ham radio station and join the global community of amateur radio operators.
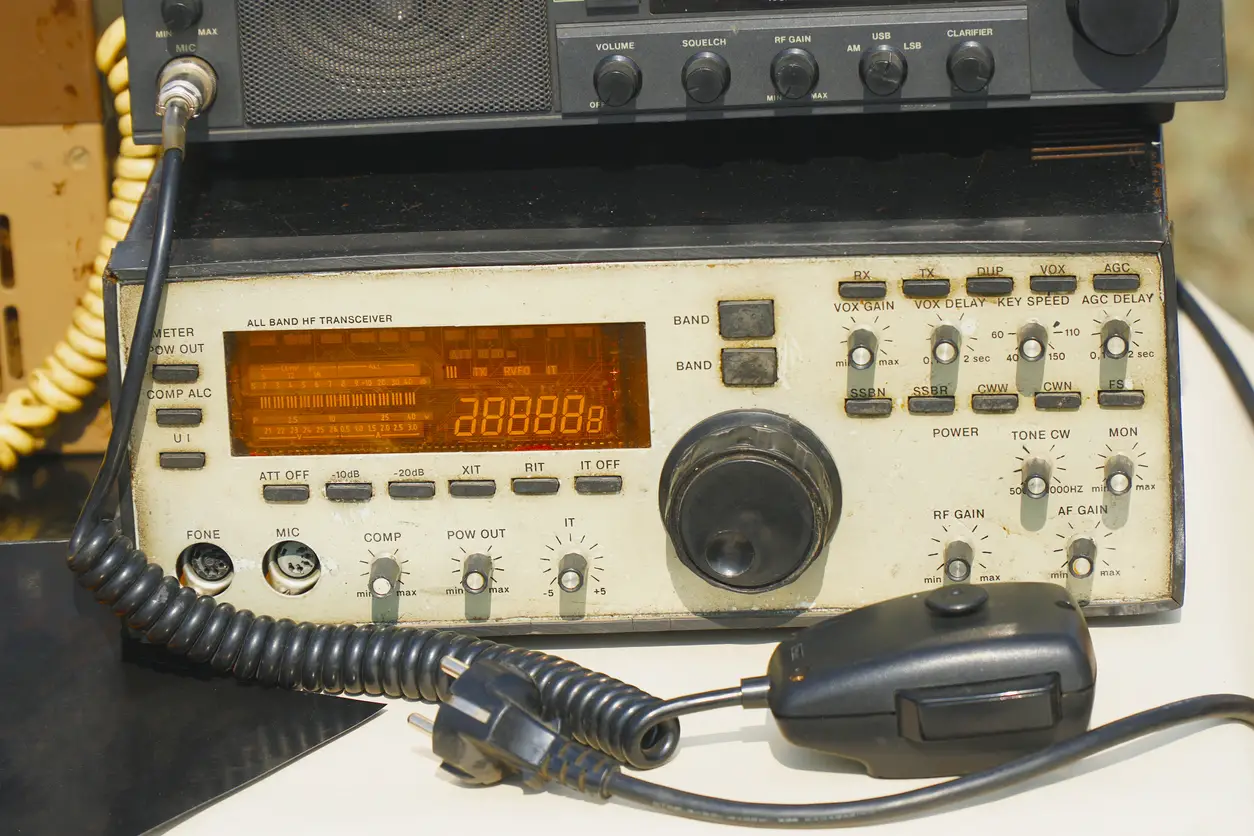
Choosing Ham Radio Equipment
When setting up your ham radio station, selecting the right equipment is crucial. In this section, we will discuss the key components you should consider, including transceiver types, power supply options, antenna selection, coaxial cables and connectors, and essential tools and accessories.
Transceiver Types
There are several types of transceivers available for amateur radio operators:
- HF (High-Frequency) Transceivers: These are designed for long-distance communication and typically cover 160-10 meter bands. They’re ideal for those interested in DXing or making international contacts.
- VHF (Very High Frequency) Transceivers: VHF radios operate on 2-meter (144-148 MHz) and 1.25-meter (222-225 MHz) bands, suitable for local communication and accessing repeaters.
- UHF (Ultra High Frequency) Transceivers: UHF radios cover 70 cm (420-450 MHz) band and are also suitable for local communication, often with better building penetration.
Additionally, some radios are dual-band or tri-band, capable of operating on both VHF and UHF bands, and even on HF in some cases. Mobile transceivers are designed for use in vehicles, while base station transceivers are meant for stationary use at your ham radio shack.
Power Supply Options
Your transceiver will need a reliable power source. Most base station transceivers require an external AC power supply, providing a stable source of 12-14 VDC. Choose a power supply with a sufficient amperage rating to support your transceiver and any additional equipment, such as amplifiers. For mobile or emergency situations, consider using batteries or solar power as alternatives.
Antenna Selection
A good antenna system is essential for effective communication. There are several types of antennas available for hams, depending on your desired operating frequency and environment. Some popular options include:
- Vertical antennas: Suitable for both HF and VHF/UHF bands and ideal for limited space installations.
- Dipole antennas: Widely used for HF communication, these are simple, easy-to-build antennas with reasonable performance.
- Yagi antennas: Directional antennas offering higher gain and directivity, often used for VHF/UHF communication and satellite contacts.
When choosing your antenna, consider factors such as your budget, installation constraints, and desired operating frequencies.
Coaxial Cables and Connectors
Coaxial cables are used to connect your transceiver to the antenna system. There are various types of coax, but for most amateur radio applications, RG-58 and RG-8X cables offer a good balance of performance, flexibility, and cost. Connectors, such as PL-259 and N-type, should be compatible with your equipment and of good quality to ensure a reliable connection.
Tools and Accessories
Assembling your ham radio station may require various tools and accessories, including:
- Crimpers and strippers: Necessary for preparing coaxial cable and connectors.
- Soldering equipment: Useful for assembling antennas, connectors, and various electronic components.
- Supports and brackets: Needed to mount and secure your antenna system.
- Microphones, headphones, and speakers: Essential for audio communication with other hams.
When setting up your station, it’s essential to follow the American Radio Relay League (ARRL) guidelines and best practices, especially in terms of safety, proper grounding, and interference prevention. Don’t forget to check your local regulations and restrictions before installing your equipment.
Setting Up Your Station Location
Finding the Right Space
When setting up a ham radio station, the location is essential. You must find a space that is comfortable to work in, has access to power (preferably both 120V and 240V AC), and is free from excessive noise or interference. This will help ensure optimal performance and a more enjoyable experience when engaging in amateur radio communication. A dedicated room or space for your radio station is ideal, but if space is limited, consider allocating a corner of a room or a closet that can accommodate your equipment and operations.
Organizing Your Equipment
Once you have identified a suitable space for your ham radio station, it is essential to organize and set up your equipment properly. This typically includes a transceiver, power supply, antenna, and any additional tools or accessories you may need, such as a headset, coaxial cable, ladder line, and antenna tuner. Keeping your equipment organized and easily accessible will help make your amateur radio experience more efficient and enjoyable. Additionally, remember to keep a copy of your FCC license and the operating manual for your transceiver nearby in case you need to reference them while operating your station.
Electrical and Grounding Considerations
Proper electrical grounding is crucial for both safety and optimal performance when setting up a ham radio station. The ARRL recommends using a dedicated station ground, which is typically a copper rod driven into the ground and connected to your equipment with a short, heavy-gauge wire. You should also have a solid electrical ground for your 120V or 240V AC power supply. In addition to improving safety, proper grounding can also help reduce noise and interference in your signals.
It’s also crucial to consider lightning protection for your station. This can be achieved by installing a lightning arrestor in your coaxial cable and properly grounding your antenna system. It’s essential to follow the American Radio Relay League recommendations on lightning protection and grounding.
Noise Reduction and Interference Prevention
One of the challenges of operating an amateur radio station is dealing with noise and interference from various sources, including electrical devices, radio frequencies, and even satellites. To minimize noise and interference, try to maintain a distance between your station and other electrical devices, and avoid using extension cords or power strips whenever possible.
Additionally, using a high-quality coaxial cable and properly grounding your equipment can help reduce unwanted noise and interference. An antenna tuner may also be beneficial in fine-tuning your signals and minimizing interference. Communication on VHF and UHF frequencies can be enhanced through the use of directional antennas or antenna elevation to increase the range and overall performance of your ham radio station.
By carefully considering your station’s location, organizing your equipment, and paying attention to grounding and noise reduction techniques, you are setting yourself up for success in your amateur radio hobby. Happy operating!
Setting Up Your Equipment
Connecting Your Transceiver and Antenna
To set up your ham radio station, you will first need to connect your transceiver and antenna. Start by ensuring that your transceiver is turned off and disconnected from any power source. Next, attach one end of a coaxial cable to the antenna connector on your transceiver and the other end to your antenna. Make sure the connections are secure and properly tightened.
Configuring Your Transceiver
Once your transceiver is connected to the antenna, you’ll need to configure the settings on your radio. This includes selecting the appropriate frequency bands and operating modes. Consult your radio’s manual to learn more about available modes and bands, as well as the recommended settings for your specific transceiver model. Additionally, you may need to adjust the VHF and UHF frequency range depending on your location and purposes.
Powering Your Station
For powering your station, you should research which type of power supply will work best with your transceiver. Most transceivers will require an AC power source, such as a 120V or 240V supply. Some lower-powered amplifiers may run on 120V AC, whereas others may need a 240V service. It is important to consult your radio’s manual for specific power requirements and compatible power supplies. Once you have chosen the appropriate power source, ensure that your transceiver and related components are grounded to prevent electrical interference.
Installing and Securing Antennas
Proper installation and support for your antenna are crucial for optimal performance. Start by researching the best location for your antenna, considering factors such as height, nearby structures, and potential interference. Some common antenna types include:
- Vertical antennas
- Dipole antennas
- Yagi antennas
When installing your antenna, make sure it is properly secured to a sturdy support structure, such as a mast or tower. Utilize appropriate tools and components, such as brackets and clamps, to fasten the antenna. Additionally, consider using coaxial cable to ground your antenna, further reducing the risk of electrical interference.
In summary, setting up your ham radio station involves connecting and configuring your transceiver and antenna, powering your station with an appropriate power supply, and properly installing and securing your antennas. By following these step-by-step instructions, you will be well on your way to operating a successful ham radio station.
Programming and Operating Your Ham Radio
Understanding Frequencies and Modes
Ham radio, or amateur radio, operates on a range of frequencies and modes, allowing users to communicate across various distances and conditions. The Federal Communications Commission (FCC) allocates specific frequency bands for amateur radio enthusiasts, covering a wide range of uses. Ham radio operators can receive and transmit on various bands such as High Frequency (HF), VHF, and UHF, which each have unique characteristics and applications.
There are several modes of communication available to ham radio users, including voice, Morse code (CW), and digital modes. Each mode has its own set of advantages and challenges, requiring users to learn and adapt their techniques to achieve effective communication.
Tuning and Using Repeaters
Before tuning your ham radio, ensure you have your setup ready, including a reliable power supply, transceiver, and suitable antenna system. To begin tuning, select a band and frequency appropriate for your desired communication range. When operating a ham radio base station, consider using repeaters to extend the range of your signal.
Repeaters are devices that receive a ham radio signal on a specific frequency, amplify it, and then retransmit it on a different frequency. They are typically found on VHF and UHF bands and can significantly extend the range of your communication. To use a repeater, you’ll need to know its input and output frequencies, as well as any tone or access codes required. Many radios today have built-in memory for storing frequently used repeater information, making it easier to recall and use them in your communications.
Digital Modes and Features
Modern ham radio transceivers come equipped with various digital modes, enabling more efficient and versatile communication options. Some popular digital modes include RTTY (Radioteletype), PSK31, and FT8, which allow for text-based communication and are particularly useful in challenging radio conditions.
Your ham radio might also offer features such as Digital Voice (DV), which uses digital encoding techniques to transmit voice signals more clearly and efficiently. These digital modes and features can be accessed via your radio’s menu system, and by connecting your radio to a computer and using compatible software.
Making Contacts and Logging
Once you’ve set up, programmed, and familiarized yourself with your ham radio, it’s time to make contacts with other amateur radio operators. It is crucial to follow good operating procedures, including identifying yourself using your assigned call sign and adhering to FCC rules.
When establishing contact with other ham radio operators, begin by listening to the frequency for a few moments to ensure it’s not already in use. Then, call “CQ” (seek you) followed by your call sign, and wait for a response. Remember to log your contacts, noting down the call signs, time, frequency, mode, and signal reports exchanged between you and the other operator. Logging not only helps you keep track of your communications but also allows you to participate in awards and contests within the ham radio community.
By understanding frequencies and modes, tuning and using repeaters, exploring digital modes and features, and making contacts and logging, you’ll be well on your way to mastering programming and operating your ham radio.
Obtaining and Upgrading Your Ham Radio License
Studying for the License Exam
To begin your journey in the world of ham radio, you need to obtain a license from the Federal Communications Commission (FCC). There are three classes of licenses, starting with the Technician License. It’s essential to study for the license exam, as the Technician License grants you basic access to VHF and UHF frequencies.
The ARRL provides resources and exam review materials for ham radio enthusiasts. You can find detailed explanations for all questions, including FCC rules, as well as a supplementary online resource with additional reference links for more information.
Taking the License Exam
After you’ve spent time studying for the exam, it’s time to take the test. The license exams, which include multiple-choice questions, are administered by local ham radio clubs or teams. To find the nearest exam location, you can use the ARRL’s search for exam teams.
The Technician License exam consists of 35 questions, while the General and Extra License exams contain 35 and 50 questions, respectively. A passing score requires answering 75% of the questions correctly.
Upgrading Your License
As you advance in your ham radio hobby, you might consider upgrading your license to access more frequencies and enjoy additional privileges. You start with the Technician License, then progress to the General License by passing a 35-question test. Finally, to obtain the highest class of license, the Extra License, you need to pass a 50-question exam.
The ARRL provides an online exam review for ham radio to help you practice and study for the upgrade exams. These resources offer detailed explanations for all questions on the exams, as well as information on FCC rules.
By successfully obtaining and upgrading your ham radio license, you will ensure that your ham radio station is legally operating with the latest knowledge and skills. It’s essential to continue learning and improving in the fascinating world of amateur radio, making it an enjoyable and educational hobby while creating opportunities for emergency communication and mobile operation.
Maintaining and Expanding Your Ham Radio Station
Regular Maintenance and Troubleshooting
Maintaining your ham radio station involves keeping all components in working order and ensuring that signals are clear. Regularly inspect your antenna system and check connections to avoid signal loss. Also, examine your coaxial cables for wear and replace them when necessary. To maintain a stable power supply, ensure that all connections to 120V AC outlets are properly secured.
If you encounter any issues, consult the user manual for your specific equipment and seek advice from experienced ham radio operators. Troubleshooting common issues, such as poor reception or signal interference, often involves checking power supply connections, inspecting coaxial cables, and adjusting antenna positioning.
Exploring Additional Equipment
Upgrading and expanding your ham radio equipment can optimize your station’s performance, allowing for better signal reception and more frequencies to explore. Some potential additions include amplifiers to boost your transceiver’s output power, which can help when transmitting on bands that require more than 100 watts. You may also consider adding an antenna tuner for enhanced antenna matching and improved signal quality.
Moreover, advanced rigs featuring advanced filters and signal processing capabilities can further enhance your radio communication experience. By keeping updated, you can ensure that your ham radio station remains relevant and up-to-date.
Participation in Ham Radio Communities and Events
Participating in ham radio communities and events can provide invaluable insights, support, and opportunities for collaboration. Join local amateur radio clubs where seasoned operators can offer mentorship and guidance in setting up your station, maintaining equipment, and troubleshooting issues.
Engaging in ham radio events such as contests and DX-peditions allows you to connect with fellow enthusiasts, exchange experiences, and potentially enhance your station’s performance. Additionally, participation in emergency communication drills can provide valuable practice and contribute to community preparedness during disaster situations.
By regularly maintaining your ham radio station, exploring new equipment, and engaging in amateur radio communities, you can ensure a long-lasting and fulfilling experience in the ham radio hobby.
Frequently Asked Questions
What equipment is required?
To set up a ham radio station, you usually require a transceiver, power supply, antenna, and a microphone or headset. Transceivers come in various types and models and it usually depends on the bands and modes you want to use. The power supply should be 13.8 volts with a current capacity of around 3 amps, especially if using a handheld transceiver. Also, for antennas, you’ll need VHF/UHF or HF wire antennas based on your frequency preference.
How much does it cost?
The cost of setting up a ham radio station can vary greatly depending on the equipment you choose. You can expect to spend from a few hundred to a few thousand dollars on a complete setup for beginners. This largely depends on factors such as your choice of transceiver, quality of the antenna, and other accessories.
Which frequency is best?
There isn’t a universally “best” frequency, as it mostly depends on your preferences and intended use. Ham radio operators use different bands, such as Very High Frequency (VHF), Ultra High Frequency (UHF), and High Frequency (HF). Each band has its own pros and cons, as VHF and UHF are ideal for local communication, while HF is perfect for long-distance contacts.
How to make the first call?
Once your station is set up, you can make your first contact using the CQ call. For example, say “CQ CQ CQ, this is [Your Callsign]”. If someone replies, you’ll need to establish communication by saying your callsign and the other person’s callsign. Maintain a proper etiquette in all contacts.
What is the licensing process?
In order to operate a ham radio station, you must obtain an amateur radio license. This usually involves taking an exam with questions about electronics, regulations, and radio operating procedures. Depending on your country, there might be different levels of licenses that grant privileges on various bands and modes.
How to choose the right base station?
Choosing the right base station largely depends on your intended use and budget. First, consider the bands and modes you want to use. For beginners, it’s often advised to start with a simple VHF/UHF transceiver and learn the basics of operating and making contacts. As you progress in your knowledge and experience, you can upgrade to more advanced equipment and explore different bands or operating modes.

